Warning: file_get_contents(http://www.youtube.com/watch?v=r9wiyrIrhvs): failed to open stream: HTTP request failed! HTTP/1.0 429 Too Many Requests in C:xampphtdocscodeketodietstart.php on line 29 .
Video Description:
If you want to know how to make the best paleo keto bread recipe, this is it! It’s quick & easy to make with just 5 basic ingredients. ------------ ↓↓↓↓↓ CLICK FOR RECIPE ↓↓↓↓↓ ------------
* FULL RECIPE HERE: * FREE LOW CARB COOKBOOK:
SUBSCRIBE to my channel:
Connect with me on social media for more exclusive keto low carb recipes: * FACEBOOK: * PINTEREST: * INSTAGRAM: * TWITTER:
Wholesome Yum creates natural, gluten-free, low carb recipes with 10 ingredients or less. If you are looking for healthy easy recipes that don't require a lot of time, this channel is for you. You'll find all low carb and keto recipes, as well as lots of paleo, LCHF, sugar-free, diabetic friendly, THM, and more.
This easy but flavorful Instant Pot Chicken Cacciatore is a fast and delicious meal any time of the year, and it's paleo, Whole30, and keto-friendly! Find the full recipe:
hey everyone welcome back to my channel nourished with love my name is Kathleen a love and after last week's video I really started thinking about how meal prep truly is the foundation of a healthy lifestyle at least in the beginning when you are new to whatever switches you're doing or new to whatever foods you're adding into your diet and and it just helps to be prepared like I said last time in order to succeed you need to be prepared and so I wanted to do another one this week but I wanted to focus on what really makes my life easier and that is my breakfasts and my lunches and maybe a snack so for me if I can have those two meals out of the way I don't have to think about it I know what I'm having for the next five days for those meals I can spend the time at the end of the day making a nice meal for myself and my family I don't I actually I really enjoy being in the kitchen if it's not all day it is so if I can have those two meals out of the way my life is so much easier so I'm gonna make a quiche with a hash brown crust so it's gluten free and this is delicious it lasts in the fridge you can microwave it you can put it in the oven the day of when you decide to eat it and it's so good it's hearty and again you don't have to think about it you know that it's good you know that it's healthy and it's ready for you in the fridge you can even eat it cold if you want but I like my warm and then I'm going to do a soup for lunch it's a cauliflower soup with bone broth and that's great because it's so nourishing as I said in the last video I'm really trying to work on my immunity and so I'm trying to add bone broth anywhere I can and soup is amazing for that so I'm gonna do a nice cauliflower blend it up soup with some bacon and then I'm going to do a sweet treat some almond butter some grain free almond butter cookies I have a gnarly sweet tooth and so if I can have those prepared and ready with some good healthy fats in them I am gonna be a happy person and then lastly and this was kind of an impulse add-on I'm gonna cook up some spaghetti squash and show you guys how I cooked my spaghetti squash I have it on hand it needs to get cooked so I might as well just do that and have it as a side later on in the week or just a snack because spaghetti squash is delicious so that's what I have in store for you guys this week please bear with me cooking videos are kind of difficult because my tripod doesn't like bend over at the right angles that I would like it to but I will do my best for you guys I hope that you enjoy and without further ado let's get into the video I first wanted to mention that if you want to make any of the upcoming recipes that you're about to watch that the exact recipes will be in the description below this week I began with a spaghetti squash to begin you're gonna want to pre-heat your oven to 400 degrees carefully slice your spaghetti squash into rounds and scoop out the seeds lay them on a parchment paper lined cookie sheet and brush each side with some olive oil and salt and pepper to taste cutting the spaghetti squash into rounds instead of in half provides you with longer more noodle like strands roast them in the oven for about 35 to 40 minutes flipping after about 25 minutes to peel take a fork and gently shred the strands away from the skin and from this point you can store it in an airtight container for up to 5 days you can eat it as is you can add a sauce to it I actually with these made hash browns out of them which were really really yummy so yeah the options are endless and I hope that you enjoy this one while the spaghetti squash cooked I moved on to the soup so in a large pot heat up three tablespoons of coconut oil and add your diced onions carrots and garlic saute for about five minutes or until the vegetables soften I had it a bit of salt and pepper to soften veggies and then added the cauliflower you'll want to brown the cauliflower before adding your bone broth and water bring to a boil and then reduce heat to a simmer secure with a tight-fitting lid and allow the soup to simmer for about 35 minutes or until the cauliflower is well softened once the soup is done cooking you'll want to blend until smooth using a blender or an immersion blender like me once smooth go ahead and stir in your coconut milk and lots of pepper taste to the soup and add salt as needed from here you can serve as is but I chose to add some crispy bacon and topped with a little bit of shredded cheese and green onions and it kind of gave it like a baked potato feel so really really hearty and delicious while the soup cooked I moved on to the crust of the quiche you want to begin with thawed hash browns be sure to check the ingredient list because many brands tend to sneak in questionable ingredients using a clean kitchen cloth squeeze out all of the excess liquid and put it in a large bowl add 1 egg 2 tablespoons of melted butter a little onion and garlic powder plus some salt and pepper to taste place the hash brown mixture into a well greased baking dish and firmly press down to create a crust like consistency go ahead and pop that into a 400 degree oven for about 25 minutes or until it begins to brown for the filling of the quiche hook up some bacon and in the same pan saute the onions zucchini and garlic in a bit of the leftover bacon fat go ahead and pour some white wine vinegar into the pan this is called deglazing and my favorite way to add some serious flavor once the vegetables are done cooking go ahead and set them aside to allow them to cool while we work on the rest of the quiche Roland in a large bowl go ahead and add eight eggs and one cup of coconut milk beat the eggs until well combined and then stir in one cup of shredded cheese 1 tablespoon of Italian seasoning salt and pepper and mix to combine stir in the cooled veggies and pour the mixture into your hash brown crust put into a 400 degree oven and then immediately drop the heat to 350 degrees allow to cook for about 45 minutes or until your quiche is set [Laughter] the last thing I made this week were some grain free almond butter cookies these cookies are a delicious treat but they do have a ton of sugar so carry caution you'll want to start by making a flax egg to make this go ahead and mix 1 tablespoon of ground flax with 3 tablespoons of water and let sit for about 5 minutes in a bowl mix 1 cup of almond butter with 3/4 of a cup plus 2 tablespoons of coconut sugar to that you'll want to add 1 teaspoon of vanilla extract 1/2 a teaspoon of baking powder and mix until well combined and lastly you're going to want to mix in your flax egg [Laughter] roll your batter into small balls and place on a cookie sheet lined with parchment paper press each cookie to flatten and then bake for about 15 minutes at 350 degrees or until browned and crispy that's it for this week you guys I hope that you enjoy this video if you did please give it a thumbs up and subscribe and comment down below let me know if you tried any of these recipes or any recipes you'd like to see me make in the future .
Video Description:
In this video I show you some of my favorite paleo meals that are excellent for your weekly meal prep. This video includes a cauliflower soup, quiche with a hash brown crust, grain-free cookies, and simple spaghetti squash.
CAULIFLOWER SOUP 2 large heads of cauliflower 2-3 T coconut oil 2 small onions, diced 4 carrots, diced 2-3 cloves of garlic, diced 4 cups beef bone broth 2 cups of water S & P 1 cup coconut milk a bit of bacon, cooked until crispy
QUICHE W/ HASH BROWN CRUST 1 bag of hash browns 9 eggs 1 zucchini, diced 1/2 red onion, diced 1 clove of garlic, diced 1 cup coconut milk 1 t Italian seasoning S & P 1 cup cheddar cheese, shredded garlic & onion powder 2 T melted butter
GRAIN-FREE ALMOND BUTTER COOKIES 1 cup unsalted almond butter 3/4 cup + 2 T coconut sugar 1 T flaxseed meal 1/2 t vanilla extract 1/2 t baking powder 1/4 t salt
SPAGHETTI SQUASH 1 spaghetti squash olive oil S & P
Learn how to make paleo chicken tenders/nuggets. These are great for kids of all ages. Our recipe is completely gluten, grain, dairy,soy peanut and artificial ingredients free. A link to Snackin' Free Bread is below.
hi everyone its Adriana from living healthy with chocolate and in today's episode I'm going to teach you how to make my recipe for orange marble cake this is an amazing light and fluffy cake with beautiful chocolate and vanilla layers this cake is very easy to make and it tastes delicious it's made without gluten grains dairy or refined sugars let's get started by juicing and zesting and orange now in a large bowl mix the wet ingredients together the egg yolks orange juice and zest coconut oil honey and vanilla extract whisk to combine everything in a separate Bowl let's mix the dry ingredients the almond flour coconut flour baking soda and salt one thing that's important and I want to note is that you give your cake the right texture you should use blanched almond flour that has been finely ground not all brands work the same for baking so I'm leaving the link to the one I use in the description of this video okay so now let's mix the wet and dry ingredients together gently being careful not to over mix now using a stand mixer whip the egg whites in lemon juice until steep peaks form now fold in half the egg whites mixing gently and then the other half place half the batter in a bowl and mix in the cacao powder so now here I have an a by four inch pan and I've lined all four sides of the pan with parchment paper so that nothing sticks during baking begin by adding a spoon of the chocolate batter in the center of the fan followed by the vanilla batter repeat this process until all the batter is used I've written the recipe for you on my blog with all the measurements and detailed instructions and I'm leaving the link to the post in the description of this video tap the pan on a counter gently and bake in a preheated oven to 350 degrees until a toothpick inserted into the center comes out clean place the pan on a cooling rack to cool for at least 10 minutes before removing it from the pan to make my cake even prettier I like this thing to talk with some maple sugar warm right out of the oven this cake is delicious light and fluffy not too sweet I like it even more the next day after its cooled in the refrigerator after its chilled it becomes a little more dance and I love the cool flavor of the orange I hope you guys try this recipe at home and share with everyone if you have any questions or comments please leave them below and I'll answer them and if you like this video please support me and give me a thumbs up also please don't forget to subscribe to my channel thank you guys for all the love and support until next time .
Video Description:
My Chocolate Orange Marble Cake is a two-toned layered cake infused with chocolate and orange flavor. Baked into a soft and moist cake without using any gluten or grain flours. (Gluten-free, Paleo)
Full recipe here:
Shop for the ingredients and brands I use in this recipe:
PIN recipe to your Pinterest board:
------------------------------------------------------------------------------ My cookbook: ------------------------------------------------------------------------------
• Comment and ask me questions below. • Subscribe to my channel and like this video if you liked it (this helps my channel grow so I can continue to bring you new episodes)
INGREDIENTS USED: Almond flour - Himalayan salt - Coconut flour - Baking soda - Raw Cacao Powder - Coconut oil - Vanilla extract - Maple sugar - 8x4 cake pan -
hi there my name is Alec tunnel and I'm a gluten-free and paleo chef and this is an episode of simply paleo with me today we're gonna be learning how to make paleo focaccia bread and focaccia bread is the type of bread that is frequently in more Italian cultures you go to an Italian restaurant that a lot of times it's what they serve in the beginning it's just almost like a pizza crust that's pretty thick and has been seasoned with all types of herbs and spices and then sliced into bread portions and it's delicious and it's a perfect vehicle to soak up olive oil and balsamic vinegar and any other type of dip fit you have in mind so we're gonna be making focaccia bread today but we're gonna be making it the Paleo way which means no grain at all so let's get started so I like to use a KitchenAid mixer because it does a lot of a mixing work for me but you can definitely use a large bowl if it's your preference so we have our large bowl here and we're gonna be putting in all the dry ingredients and mixing them so they get incorporated and then separately we're gonna do the liquid mixture and the liquid ingredients and then we're gonna pour the liquid into the dry and mix it up so that it becomes a batter or dough for the pizza or foot talked about so in this bowl I have one and a half cups of cassava flour now for those of you that are new to the paleo lifestyle cassava flour is a flower that is grain free it's actually made from the cassava root some of you may be familiar with tapioca starch tapioca starch is actually the starch that's been extracted from the cassava root so cassava flour is the whole root that's made into a flour and it's perfect a perfect flour vehicle to make a lot of things most things you have to mix it with other types of alternative flours to get the right consistency but if you're making things like tortillas it's perfect on itself so we have a cup and a half cassava flour and then we have a cup of arrowroot starch which is also made from the arrowroot a root vegetable and so we're going to mix both of those in here and then we've got a couple of other dry ingredients in here I have one teaspoon of sea salt I typically use fine sea salt when I'm putting it into things and if I'm sprinkling something on top I might use more of a coarse Himalayan type so in here I have a teaspoon of fine sea salt and a teaspoon of cracked dried rosemary now rosemary is very easy to find in a dried form but it can be a little bit off-putting if you get a whole bit of it so a lot of times what I'll do is I'll take the rosemary and I'll put it in a mortar and pestle and I'll crush it a little bit not into a total powder but just enough so that they're not large chunks or large sort of Spears you can also do it in the palm of your hand just by crushing them with your fingers whatever works so got a teaspoon of that and then we've got a teaspoon of onion powder and today I mix it up a little bit there's a wonderful spice store called Penn ZZZ and their local toss in Connecticut but they also have a fantastic website in catalog and they're really good quality spices and spice blends and they're not exorbitant ly expensive and they have granulated air-dried shallots which are a little bit sweeter in this form than the typical onion powder but just the savoury also so I use the teaspoon of the shallot powder which you can also interchange it with onion powder and so what I'm gonna do is take those three ingredients and mix it into my dry mix and then I'm going to take the bowl and put it in the kitchen a sauce or stand and turn it on just to get everything incorporated but if you have a large bowl and a spatula that's fine too you can just we need to refine this in and we're just mixing it up so that all the ingredients are mixed well before we put our liquid ingredients right nice and mixed so now I want to do the liquid mixture so in this measuring cup I have a cup of water which ideally is filtered water or some type and then I have half a cup of extra-virgin olive oil that I've already mixed in here now in addition to this I want to add two eggs and then what I'm going to do is whisk this separately because I don't want to put all the individual ingredients into the dry batter I want to really make sure it's already mixed not to say that it doesn't work the other way but this definitely creates more of a consistent batter which is what you want so that when you're eating it it has more of a consistent texture okay so what we're going to do is we're going to whisk up the two eggs the 1/2 a cup of extra virgin olive oil and the cup of water until it's consistent and incorporate as well and what I'm going to do now is I'm going to take this and I'm gonna pour it into my dry mix and then as they start to get incorporated we'll go to the yep now if you're doing it in a bowl mix it up and pull it to blue now if you're using the KitchenAid mixer partway through what you want to do is scrape it down because sometimes there's bits of the dry mix that's stuck on to the paddle and kind of cover it up by selling the batter so it's helpful to scrape it down or you can just turn it off and just mix it some more with a spatula by hand so we're gonna just use the mixer now this batter is not a typical pizza dough batter in the sense that it's a little bit stickier than what someone would be used to with a more you know gluttonous pizza batter so we're just gonna take this off and I'll show you the consistency now wall-eyed before I did this I preheated the oven to 425 and while I preheated it I actually took the baking sheet or the half baking sheet that I was using and I put it in the oven before I turned it on and then I preheated the oven with a baking sheet inside and the idea is to try to get the baking sheet to be really hot so that the pizza crust can get a little crispy on the bottom it's kind of like using a pizza stone and you can certainly do this on a pizza stone just make sure you're using parchment paper because as I said this does get a little sticky so let's show you this batter we're gonna bring it closer to the video and you can see that it's a sticky batter but it's not wet it's not liquidy now what we're gonna do is we need to roll it out you can put it on to use oil or wet fingers to spread it out but what we're gonna do is we're gonna put another piece of parchment paper over it and we're gonna just use a rolling pin now it's a little bit of a awkward process sometimes because the parchment paper can get a little mobile so first we want to just get the batter onto the parchment paper so I have to pretty bit the equal size sheets of parchment paper before I put the baking sheet in the oven i measured the parchment paper to make sure that it was the right size okay all right so now we've got this ball of dough and I could use wet oils fingers to spread it out into the shape that I want but instead I'm going to I'm just trying to get all this good stuff off there we go I'm gonna just take another sheet of parchment paper my finger wants achacha to be the focaccia dough to be a little bit more thicker than a typical pizza crust just gonna take my rolling pin and I'm just going to gently create a smoother consistency okay and try to give it the shape that I want which is somewhat rectangular I'm not being a perfectionist here but I'm gonna try to get it to be the shape of the baking sheet essentially you don't have to worry about having extra crust because the whole thing is across right that's the idea and if you get a little bit that comes off the parchment paper it's not a big deal we can fix it after okay so now we've got the parchment paper that's spread over and everything's rolled out - the next step is to get is to get the hot baking sheet so wait right here here's the parchment paper then you can get it to be a little bit smoother you can spread down the side that might have been rolled up too far away either way is fine but just be careful because that baking sheet is a little bit hot right and I'm just gonna spread it out now if you have a little bowl of water or oil you can wet your fingers or wet your spatula which is a good way to do it too and that's it and now what we're gonna do is take the remaining teaspoon of crushed rosemary that's been dried and also a half a teaspoon of more coarse sea salt or if all you have is fine that's fine too but I have the Himalayan coarse sea salt and I'm gonna take this and I'm gonna sprinkle it on top and this is what gives it that incredibly flavorful taste it's all that salt on top it's so good for you the sea salt has so many wonderful minerals and then you really don't have to worry about the sodium issue because when you're eating sea salt there's such a balance of minerals and sodium is not the overpowering mineral in the mix and then you've got the rosemary that's so flavorful and there you go and now what we're gonna do is we're gonna take this and we're gonna put it in the oven so I'm gonna do that after we talk because I made focaccia bread beforehand rosemary and salt it's so fragrant so we are going to cut it into slices and see what it tastes like so let's see it just came out of the oven and you can see how it's slightly thick and let's see here all right you can see how it's thick and it's got the wonderful seasoning on top and it is so fragrant mmm so delicious it's crispy on all the surfaces and inside it's a little bit of that doughy delicious soft warm texture did you take a bite you get some of that Himalayan sea salt for the rosemary which is so so wonderfully flavorful in your mouth and then of course you get some of that onion powder flavor with a rosemary inside it's so delicious mm-hmm really yummy this is a perfect accompaniment to so many different meals so good my kids were very excited to hear that I was doing focaccia bread for the video today because of course that means we're having two layers of focaccia bread was our dinner they were very excited because it's so delicious and if you make it in advance you can just put it in the oven to heat on 325 350 and just heat it up again they'll get a little crispy on the outside but it'll get nice and warm again on the inside and then just cover it up until you're ready to serve and you can slice it in any way that you want Pizza wedges squares anything so I'm glad you watched I hope you make this recipe at home it's pretty simple recipe everything goes into the bowl and then you lay out left the dome we're gonna get this delicious focaccia bread and as always I'd love to hear from you and you wish list you have any cravings and questions you can check me out on my blog at wwlp.com and I hope to hear from you and stay tuned for more episodes of simply paleo and you can see lots of wonderful recipes and cooking demonstration videos on my blog as well so take care .
Video Description:
Welcome to Simply Paleo with Ayelet Connell PhD! During this episode, watch Ayelet demonstrate how to make Paleo Rosemary Focaccia bread. For more episodes of Simply Paleo, visit www.SimplyPaleo.com.
This low carb paleo almond flour pie crust recipe is so easy to make. Just 5 minutes prep and 5 ingredients! Gluten-free, sugar-free, and keto. ------------ ↓↓↓↓↓ CLICK FOR RECIPE ↓↓↓↓↓ ------------ * FULL RECIPE HERE: * FREE LOW CARB COOKBOOK:
SUBSCRIBE to my channel:
Connect with me on social media for more exclusive keto low carb recipes: * FACEBOOK: * PINTEREST: * INSTAGRAM: * TWITTER:
Wholesome Yum creates natural, gluten-free, low carb recipes with 10 ingredients or less. If you are looking for healthy easy recipes that don't require a lot of time, this channel is for you. You'll find all low carb and keto recipes, as well as lots of paleo, LCHF, sugar-free, diabetic friendly, THM, and more.
MORE LOW CARB RECIPES TO TRY:
* Easy Keto Low Carb Pumpkin Pie Recipe (Sugar-Free, Gluten-Free): * Pumpkin Pie Cupcakes With Crumble Topping (Paleo, Low Carb): * Low Carb Cheesecake (Keto, Gluten-Free, Sugar-Free):
Insanely delicious Mexican-style salad with chicken, avocado, pico, tomatoes, green onions, cherry tomatoes, and a dreamy cilantro vinaigrette. Just 30 minutes required for this paleo, gluten free and dairy free meal!
Full recipe:
PRODUCTS: Pepper and salt mill - Olive oil - Salt - Black peppercorns - Cumin powder - Garlic powder - Cayenne pepper - Dried oregano -
hi everybody it's Adriana from living healthy with chocolate today we're going to show you how to make one of the most delicious zucchini muffins they're made with healthy and nutritious ingredients and that the whole family will love this recipe contains no gluten wheat flours refined sugars or dairy and this is by far one of my favorite muffin recipe because the texture is perfect it's soft and moist and even though we're adding a vegetable here you can say that we're adding the zucchini so before we get started you can find this recipe on my website and living healthy with chocolate comm and if you haven't yet subscribe to my channel be sure to tap the subscription button below so you never miss my upcoming video now the first thing we need to do is preheat our oven to 350 degrees and finally shred half a zucchini edible Keeney to a large bowl along with an egg fresh orange juice melted coconut oil raw honey vanilla extract and mix to combine ingredients in a separate Bowl we're going to mix the dry ingredients so add your flour cinnamon baking soda and salt to keep this recipe grain free I'm using finely ground almond flour that also has the skin removed and this is important to give your muffins the best texture but in case you have nut allergies you can substitute the almond flour for pumpkin or sunflower seed flour gently mix the flour with the wet ingredients just until combined line your muffin tin with paper cups and fill each one two thirds of the way hole bake for 20 minutes or until a toothpick inserted into the center comes out clean I love the tasting section of these muffins they're so soft light and moist look at this texture if you like this recipe give this video a thumbs up and be sure you have subscribe to get to my channel thank you so much for watching enjoy these muffins and I'll see you very soon with a new recipe bye .
Video Description:
Need a Zucchini Muffin recipe that the entire family will like? Mine are soft, moist, light, healthy and delicious! You can't taste the vegetable.
Written recipe:
Shop for the ingredients and brands I use in this recipe:
Subscribe to my newsletter so I can personally send you new recipes, and first dibs on other subscriber-only resources you can’t get anywhere else:
------------------------------------------------------------------------------ My cookbook: ------------------------------------------------------------------------------
• Comment and ask me questions below. • Subscribe to my channel and like this video if you liked it (this helps my channel grow so I can continue to bring you new episodes)
okay well here we are again guess what we have two microphones now fancy so here's the deal we both just got home from work we're both tired we both don't want to do this but guess what we're gonna eat so this is a video of us just making dinner so tonight we are gonna have roasted vegetables the best roasted vegetables any recipe actually but it combines a whole bunch of vegetables it'll be a sheet pan has broccoli cauliflower Brussels sprouts sweet potatoes beets a bubble garlic awesome and chicken thighs yes they are paleo honey glazed chicken thighs sweet and I get to use my Gigantor new skillet again so let's make dinner so here's a protip a biohacking tip if you will that's for you Eric Richards my fellow biohacker did you know that broccoli in particular and I can't think of a name of the nutrient that does it but there is a nutrient in broccoli that up regulates a pathway in your body called the nrf2 pathway why is that important you asked so for years and years and years we have thought that antioxidants were the way to go to decrease inflammation and we're starting to understand this nrf2 pathway better that basically stimulates your body to produce its own antioxidants so rather than taking grams of vitamin C you might be able to get away with the vitamin C from an orange and eating something like broccoli to help upregulate this nrf2 pathway so your liver can make more of this lovely stuff called glutathione and that can help with a lot of different chronic conditions here that when I talk nerd it turns her wrong plan on more nerd videos tonight on Kevin Brady OHS Paleo kitchen we chop vegetables and talk like dorks and talk like monster truck announcers did you see Jenny's comment so Jenny my sister loved you says it says that Billy says her pro tip is when we scrape the cutting board he's great with the back of the knife so dull the front of a knife that is true I did my mom really genius but I just forgot thank you thank you I can't guess what I just got back from Schrute farms beets two plates of veggies you know what that means leftovers kind of make myself more excited about leftovers I don't like it I am grumpy about them even though they're so good they are very good for you and they save you a ton of money because you know who doesn't want to save money I guess what I've had zero carbs today hey do you need to wear safety goggles and gloves apparently I do I need some safety Bueller dadgum I did it again oh my goodness please refer to the sign in the back window says homemade with love in other words I lick the spoon and keep using it so yeah I just looked myself awesome glad this isn't a restaurant did you just see that garlic applying that what's epic it would have only been better if it had actually hit you in the face [Laughter] turns out peeling these garlic I'm sure there's a pro tip for these I've never known it that yeah so if you have a pro tip for peeling garlic would you please let us know we'll feature you with all of our 31 followers these artists don't know what they're missing they really don't they're just eating their McDonald's and not knowing why they don't feel good we should talk about that for a second okay just because you don't have a food allergy to Dairy does it mean you should consume it correct now that was a question to you it wasn't a question yeah does it mean you should consume it no you should not let's get a little nerd taco my turn you on again alright so here's the deal this is not my doctor platform so I can say whatever I want right just that person the two biggest lies in the medical community that we're being fed are number one that cholesterol is bad that is false fact I will interject this little state now if your cholesterol is below 150 Cameron goes really bad I'm just kind of sitting here on my own but anyway if you if your cholesterol drops 150 your chances of chronic disease triples your great book that you should read it's called the great cholesterol myth and then you can join me because I am a redneck and a conspiracy theorist no really cholesterol is not bad for you you need to eat it you need to consume it and we'll talk about that later the second one is that milk does a body good milk does not do a body good and here is why back in the eighteen hundred's this guy named Louie Pasteur discovered that if he heat milk up they keep killing the bacteria but it kills the bacteria it would last longer unfortunately what he didn't plan on was when you cook milk to pasteurize it you kill the enzymes that your body needs to digest it so you can't digest it and your body recognizes those proteins as undigestible proteins and stimulates an autoimmune react can stimulate an autoimmune reaction and what might that look like no it could be anything from headaches to vision problems to weight gain to diabetes to upset stomach upset stomach is gonna be more of the lactose intolerant lactose intolerant people lack the enzyme called lactate them break it down lactose and that will cause them I want to know we're gonna see people because we're doing strict paleo right now and if his gas is diminished then I'm right farting is good for you when you have healthy gut bacteria they make gas hmm it's a gift you can I quote one of my favorite movies I don't know Canyon is it Hopkins a quote is appropriate but the movies not this is the most beautiful thing I have ever seen it's beavis and butt-head I don't need to admit high intelligence with high brow low class that's how I roll say that all again it's gonna be a little different way to roast veggies babe typically we do garlic or we do some maple but guess what just salt and pepper there is garlic fresh garlic on here though it's bound to be delicious into the oven they go at 400 degrees for woosh good thing we're gonna do those smoothie appetizers so here's a personal moment I quite enjoy fishing I used to be a guide I go quite regularly and Justin my oldest stepson went fishing today went fly-fishing that's the only way I know how to fish and he went with his grandfather and my dear friend for the first time for the first time I'm granted my dear friend is a guide and this was a guided trip for Justin but look at this a clown mask and a very sweet trout no I won't cook it I don't like trout by the way we're not using the highest quality olive oil right now why because when I went to buy olive oil this was the only thing that was available because people were panic buying shockingly they probably didn't buy the extra for novel I don't know why it wasn't there it's gone vegetable oil cleaned out well duh we know why that was what I'm Mitch did you just wake up one of our little adult humans heard that we're having smoothies so he woke up okay the vinegars in did you have any a teaspoon out of there of course one teaspoon that matches the kitchen sorta these actually look like they're gonna have a good amount of glaze I hate when you do a recipe that's like this doesn't work for this amount of me it's like dry did you start I'm a saucy person saucy and sassy I just like to have a lot like to taste they think hey hey you look beat that's a good sign how was it please note gradients so excited about it is the new pan look at the size of that thing chicken middle rack we have named her birthday dinner is served it is ready and the Wolves have lined themselves up to eat I've tasted all the veggies they're good haven't ya all right delicious oh babe you got to get an arch to it you're thrown to flat I'm not Oh [Laughter] .
Video Description:
Day 3 of the COMPLETELY PALEO challenge: Paleo Honey Glazed Chicken Thighs, The Best Roasted Vegetables, and some sciency, biohackey, nerdy stuff about the NRF2 pathway that helps your body make it's own anti-oxidants!
These meal was just as good as leftovers as it was the night we ate it!
*music* Hi this is Steph from StupidEasyPaleo.com and today we're making my Comforting Creamy Broccoli Soup aka Crack Soup. This is one of my favorite soups ever. If you know me you know how much I love soup. This one is perfect if you're dairy-free. It tastes just like a cream of broccoli soup but without the dairy or cream. There's no milk so you're able to stick to a dairy-free way of eating.
I start with a leek. A leek if you've never seen it looks like a green onion on steroids. It looks exactly the same. It's light green and white on the bottom and dark green on the top. The trick with a leek though is they get really dirty on the inside.
So what I do is I slice the leek lengthwise down the middle and then I take those and run them under the faucet so that I get any grit out because nobody who wants gritty soup. I take that leek and then I chop it up. I also chop up half of a white onion and then about a pound of broccoli. To the leek, the onion, and the broccoli you're going to add two cloves of garlic. Then we're going to add the liquids.
The liquids in this recipe are going to be 4 cups of chicken stock. I would recommend homemade if you can. If you can't and you have to buy chicken stock from the grocery store, that's fine. Just try to look for something that's low sodium or sodium free. That way you can control the saltiness of the broth by adding your own seasonings at the end.
I also add a cup of coconut milk and that's what gives it that body, that gives it the creamy texture and the really nice mouthfeel and flavor without adding any dairy at all. I also like to add (to just give it that little buttery edge) I like to add a little bit of ghee which is a clarified butter. You could certainly add add grass-fed butter if you want or you can just leave that part out but I think that gives it a little secret creaminess and flavor that you can't get from other types of fats and oils. You're going to add all of that to the pot, and you just put it on the stove bring it to a boil for about 20 minutes. You going to simmer that until the vegetables are soft.
Then from there carefully add that to a blender. Sometimes I do it in two batches in case it gets a little bit too full. You're going to blend that on high for about a minute until the soup is nice and creamy and you can serve it right from there. Sometimes I like to top this soup with a little bit of shredded chicken and that makes it a complete meal. You could serve it alongside a salad and a piece of steak and you're going to have a delicious weeknight dinner that takes almost no time to prepare.
For my Comforting Creamy Broccoli Soup aka Crack Soup and more recipes just like it head to StupidEasyPaleo.com. .
Video Description:
Comforting Creamy Broccoli Soup is like a warm hug in a bowl. This dairy-free, gluten-free, paleo, whole30 soup comes together in less than 30 minutes. It's packed with veggies and super healthy.
The method is simple: Simmer chopped veggies in gut-soothing chicken broth, add a splash of coconut milk and blend it until it's smooth. I always make a double batch because this soup is so delicious and flavorful. It' earned the nickname Crack Soup because it's so addictive...in a good way!
Get the FULL Comforting Creamy Broccoli Soup recipe here:
Be sure to subscribe for more cooking show episodes:
hi guys it's Dana with Whole Health datacom and today I'm going to teach you how to make plantain wraps and first thing you might ask is what is a plantain wrap well plantain wrap is an alternative that somebody especially somebody that has gut issues leaky gut or other sort of autoimmune issues where they should be eating no gluten or grains this isn't a bread alternative basically so I use it in place of like a tortilla sometimes you just want to be able to wrap your food in something or you want something that is kind of bread like and this is perfect it's really easy to make the hardest part is finding green plantains now when they're green they are not ripe as they start to turn yellow and brown they start to get sweeter and a lot of people compare them to a banana because they look like a banana but really that's where the comparison ends so what you're going to need for making the plantain wraps is you're going to need three green plantains if they start to turn a little bit yellow you can still get away with using them for this that's not going to be a problem the first thing we're going to do is we're going to peel our plantains and I already started this one but I'll show you with the next one exactly what I did so I take the plantain and I cut off the tips of it and then I slice just all the way down the edge so that there is a section where I can get my fingernails underneath and slide it through because I'm going to you know basically I'm going to pull it off okay so we're going to just kind of dice up our plantains and I'm going to do all three of these it should make approximately if these were cubed about four cups of diced panting okay so after I've diced all those I'm going to pour in 1 cup of water I need 1/3 of a cup of organic extra virgin olive oil I need 1 teaspoon of sea salt all right so at this point we're just going to put it on the blender on the base and we're going to run it for a minute or two depending on how creamy it's getting and I'm going to I'm going to run it on high if it is too thick use your tamper to push down the contents until it's moving smoothly on its own okay so once it's been completely processed you're going to pour it out of your picture into a pan that you have lined with parchment paper now I'd say this is probably I don't know a 13 by 17 pan and it's going to make six rafts now today you can see it's it's a pretty thick consistency probably a little less than a paste and if you think that it is too thick you can add a slight bit amount of water it might have just been that you had some pretty large plantains but it doesn't really seem to affect it much after you bake it and then we're going to spread it out flat this turned out super creamy and nice today and then I've already preheated the oven but you want to preheat the oven to 375 degrees so here's what it looks like once I've got it all completely spread out so you might be wondering what you're going to do with these wraps once you have them and really you can use them for anything that you would use a normal wrap for you should understand though that they're not going to be as thin and as bendy and they're not going to wrap completely around like you would like if you got something as a a store it's going to be more like a bent-over taco shell but what you can do with it is put some meat with some cheese some vegetables maybe make yourself a BLT an avocado in it sometimes I just put some honey and some sunflower seed butter on it just anytime I feel like I might need something kind of bread like so be creative you can do anything you want with it okay so I left that in the oven at 375 for about 28 minutes so when it's done it looks rolled in is soft what you do want to do is while it's still soft take a knife and just score down the center and then go twice across the other direction basically what you're doing is you're making six wraps you just let it cool off and you can use them whenever you want for a wrap I actually you can see what it kind of looks like so when you pull it out kind of hot but you horse won't be if you do it properly so anyway it's going to look something similar to this and then you can just put whatever you want on the inside of it and you know wrap it like a like a taco around it so if you would like to see more recipes like this like this YouTube channel or you can also look for me on WWL health.com if you like to follow me on social media you can check the links out to below and we'll see you on the next round have a great day bye .
Video Description:
Paleo & AIP Plantain Wraps are a great gluten-free alternative to tortillas. They're also vegan, dairy-free & grain-free.
Subscribe to this YouTube channel
Visit my website for a printable recipe: www.WholeHealthDana.com
Follow me on social media: www.facebook.com/wholehealthdana www.pinterest.com/wholehealthdana www.twitter.com/wholehealthdana www.instagram.com/wholehealthdana periscope.tv/wholehealthdana blab.im/wholehealthdana
DRUNKEN CHICKEN ZOODLE CASSEROLE takes a spin on the original Pad kee mao Asian stir fry and puts it in casserole form. A paleo friendly zucchini noodle casserole with tons of flavor, Thai spices, and simple healthy ingredients! A delicious, light, high protein, low carb recipe
do you live a healthy paleo lifestyle and wondering how you can get jelly lollies back into your life course you are we're here to show you how welcome to that Mary mega channel today we're talking healthy jelly lollies YUM because before paleo and before healthy living we wear like sugar and it's like we could just eat all the holism wanted then we'd go slave away at the gym for like two hours burn up all of those calories so it's not just like I like the way we live now we want to share with you guys how we make paleo healthy jelly boys yes you can do it they're actually like super good for you why well we actually make them with gelatin it makes your skin clear it makes your hair shiny and makes your nail a strong your joint yeah it's really good not good like you know arthritis mmm osteoporosis yeah we're gonna share how to make healthy jelly Louise no way paleo - yes way alright get all of your ingredients together you're gonna need fruit juice gelatin natural sweetener and silicon molds today we're using lemon juice but you can use whatever you like think be true orange strawberry add your juice to a saucepan and sprinkle with one and a half tablespoons of gelatin powder allow that to sit for around five minutes and it's gonna turn into this jelly paste place the saucepan on your stove on medium heat and heat for around five minutes until the jelly paste becomes smooth pour the jelly stuff into cute little molds we're using ducks and it's cute because they're yellow so they look like ducks place the mold into the freezer for 20 minutes then it's as simple as popping them out and eating them they look so super cute and they're ridiculously yummy the perfect snack in fact they're kid-approved Ameriprise of them - did you guys like those paleo jelly loved those paleo jelly if we missed anything if you need the recipe in your life click the link below it goes straight to a recipe on the merrymaker sisters calm it's that this recipe features in our brand new book make it marry that I have a copy right here on some slow down I have a copy right here yeah if you guys want your print if you want to on the blog if you want your we're covering all bases jelly lollies are going to be in your life one day very soon .
Video Description:
Didn't quite catch the recipe for our Paleo Jelly Lollies? Check it out HERE:
BUY THE BOOK HERE:
GET OUR FREE HEALTHY SWEET TREAT EBOOK:
FIND ALL OF OUR FREE RECIPES:
CHECK OUT ALL OF OUR BLISS FOLLOWING TIPS:
JUST HAVE FUN OVER AT:
GET SOCIAL WITH US: Instagram : Facebook : Pinterest : Twitter :
hello my name is al O'Connell and they're paleo and gluten-free chefs and this is an episode of simply paleo with me and today being fall and beautiful beautiful weather crisp crisp season this morning there's frost on my car it's all things pumpkin pumpkin is definitely symbolic of the fall season and in New England it's a big part of our culture so today we're going to be making pumpkin soup and pumpkin soup is a wonderfully nourishing fragrant fall soup but what's wonderful about this recipe is there's a lot of variations on the theme that you can make to mix it up and still use the basic same recipes so today we're going to be using it sugar pumpkin which is essentially a small type of pumpkin that's a little bit sweeter in flavor and we're gonna be using apple and some autumn seasoning like cinnamon and nutmeg and allspice and some ground cloves and some onion and some chicken stock and a little bit of maple syrup it's a very simple recipe and very easy to make so I did a little prep before you join me this morning just so that we don't have a lot of extra time involved in between the steps so the first thing I did is I have my big stew pot here that's on the stove and I put about a tablespoon or two of olive oil in and heated up medium heat and I took an onion you could use a small onion a large I mean it doesn't matter really depends on the flavor profile that you prefer I usually do a medium to small onion and I chopped it up I cut it I peeled it I chopped it into small pieces and I put it in the oil looks it was hot and I caramelized the onions and so you just want them to be nice and soft and translucent and you can smell that caramelized onion smell in the air too and you give definitely the pumpkin soup a little bit more of a hearty flavor but it is somewhat of a sweet soup so it gives you a nice robust flavor but the reason the size of the matter so much is because if the end we're going to be blending the soup to give it a nice puree and silky texture so though I'll answer already caramelized that I have it on low so it wouldn't be bothered with too much of the noise now I'm just raise the temperature a little bit now what I did earlier which is really helpful is to take a pumpkins I'm going to go through the steps with you so a sugar pumpkin is about this size so you need one of these for the soup and what you want to do is pick the San Juans which be a little bit careful when you so large knife if you want to be a little careful because a little tough to do and then once you take the stem off you can cut a pumpkin in half from top to bottom and then what you want to do is take the seeds out so you see that the inside of the cavity is filled with pumpkin seeds or Fitbit does so what I want to do is take it out you'll see on this side I just used a spoon to remove the seeds and I literally just try to scrape a little bit further than where the seeds reside on the inner layer and then just scoop them out so I'll show you with this one how to do that you can see where the seeds are so what I do is I kind of dig a little bit about half you can see how I'm doing that around where the seeds are a little bit into the meat as well just to make it easier so I don't feel like I have to scrape the seeds and then nice and easily they come out and then what I'm gonna do is just star of the seeds and if you want to make roasted pumpkin seeds is a great recipe on my blog on simply paleo calm where you take the pumpkin seeds so make sure that they're nice and dry and you can mix them with a little bit of oil and season it and in my case I use some salt and a little bit of pepper and some paprika and then you just put it in the oven at about 350 degrees on some parchment paper make sure that it's spread out in a thin flat layer and roast um but you have to keep monitoring which shouldn't take more than about 10 it's but if you started to hear them popping then they can definitely get close to burning and so they didn't want to be able to lower the oven if they're not all roasted yet or turn off the oven in Sigma okay so how do you remove the season either discarded them or set them aside to you to make them into rusyn seeds you can see the empty cavity so I have here a tray a metal tray and the oven is preheated at 425 degrees which is a good temperature to roast winter squash boards and what I'm going to do is I'm going to sprinkle a little bit of salt on and I always like to use sea salt because with a lot of wonderful minerals in it but I'm not too concerned about sodium levels with sea salt and then what I'm gonna do is take a mixture of about a half a teaspoon of cinnamon 1/4 teaspoon of nutmeg and then like a pinch of ground cloves and some allspice you could do more than that if you want but I'm literally just gonna sprinkle this on the open space of the pumpkin to get a nice coating okay you can see it's just nice and well-seasoned and then I'm gonna take a little bit of olive wood it can take regular olive oil or you can take an olive oil spray just try not forget it in your face and just push the inside oil and then the last step for this part is we're going to take the pumpkin and we're gonna put it facedown on parchment paper and then we're gonna take it and we're gonna put it in the oven remember it 425 and what you want to do is cook it takes about a half an hour at 425 but it kind of varies depending on the size of your pumpkin and you don't have to use a sugar pumpkin but they're just a little bit sweeter and a little bit easier to manage and then what you're gonna do is when you how you know the pumpkins ready is it take a fork and you try to puncture it through the outer skin of the pumpkin and if it goes through very easily and you can smell that smell the pumpkin and it's sizzling a little bit on the bottom line you know it's red and you can take it out cool but for the suit typically when I do winter squash like butternut squash acorn squash I typically just peel it and cut it in half take out the seeds and discard them and then I chop it up into big chunks and I just put it in a soup that way I don't roast it in advance but with a pumpkin the skin is so thick it's really hard to peel and this is just a great way to do it it makes the soup process a little bit quicker so today's about a half an hour to cook but I did another pumpkin earlier just so that we would have to wait that amount of time and I want to show you how it looked so this is essentially the pumpkin that's been roasted and you can see how it's nice and dark in color from the cinnamon that is so fragrant beautiful and it's literally starting to come out of the skin so as you can see when I started to do is I took the meat out of one half and now let's do it I'm just gonna add it to here to this bowl and this literally is simple it's just scooping it out of the peel and it is so fragrant the smells I can just smell those an extra seat here cinnamon nutmeg cloves the allspice it is so wonderful it definitely makes me think of all the pluses of the policies and the frost is the negatives for sure my car this morning that my husband very sweetly got rid of and when I went out this morning picked the kids to school I noticed that the frost had been scraped and I thought to call and say thanks victim kisses the phone so here's my pumpkin so the next step I have the onions caramelize and now what I'm going to do is put the pumpkin in and I'm going to put some chicken broth in this it's about a quart now the amount of chicken broth that you use is really dependent how much company huh and how thick or thin you want the soup so typically I'll do a quart of chicken broth and I'll do about the two cups of water the water I might reduce depending on how thick roots I want the suit put the chicken broth in the Cupid chapter because I want the broth to come and the soup to come to a boil before I leave it to simmer I'm going to add the water in as well and this is topstitch water honey and then I want to do is take an apple if it's a really nice sweet somewhat tart flavor also added to the pumpkin soup so generally what I'll do is I'll just peel the Apple and cut around the core to start the core just chop it in chunks and put it in so I've already done that so you can see that they're just pretty big chunks it really doesn't matter because once it's nice and soft from the boiling of the broth then we're just gonna blend it with an immersion blender so I'm gonna add the apples in now when I do this type of soup with winter squash like butternut squash or acorn squash then typically I'll add seasoning to the suit instead of putting it right on the squash you think if this hasn't been roasted so in that case I'll do about a teaspoon or a half a teaspoon of cinnamon I'll do a half a teaspoon or a quarter teaspoon of nutmeg and I love doing a quarter teaspoon of allspice and about a pinch of cloves and then I'll typically do about a teaspoon of salt but in this case we put some salt on the pumpkin already so I'm gonna put about 1/4 teaspoon of salt in the soup in addition and you know you think that's a sweet food salt always seems to make it a little bit sweeter because I think it helps to make the flavors more robust so then the last ingredient which I typically wait it's a nice hot hot I typically wait until it's boiling it can maple syrup and the maple syrup it's about a quarter I just found a little seed in here a quarter cup of maple syrup so I have that ready and waiting here in my little bowl and as it comes up into a boil then I'm gonna add the maple syrup and then what I'm gonna do is I'm gonna bring it up to a boil and then I've didn't lower it to a simmer and I'm just gonna let it cook until the apples are fork tender literally can be switched to the fork and then I know that it's well uncooked and then what I'll do is take it off the burner and let it cool a little bit and then if you have an immersion blender that's always easiest now I have a commercial immersion blender this week we lovingly termed it as our boat motor at home and what I love about it is its metal and I don't have to do a lot of cleaning but also I'm not exposing plastic to heat in anything that I'm eating which is really important because there's a lot of toxins that can get to your body from keeping up plastic so I'll use the immersion blender which is very simple I'll just plug it in and I'll stick it in the soup make sure it's submerged and then I just turn it on high until everything it's really silky and texture but if you don't have an immersion blender which is fine then what you can do is let the soup cool and then put it into your blender and blend the soup and then it's ready to go and nice and delicious so this is coming up to a boil so I'm gonna take the maple syrup and I'm gonna pour the maple syrup and I'm just gonna stir it and then I'm just gonna let it continue to boil a little bit to get everything incorporated and then I'm gonna lower it to simmer and then I'm just gonna let it cook for a while it might take an hour so maybe half an hour depends on how high the simmer is until everything's really soft and then you can use the immersion blender or let it cool completely put it into the blender flex it up and there you have your soup and I will say that this soup is delicious the day after we'll treat very nourishing and the only you can do as you can garnish the soup which I'll show you the moment with a little bit of roasted pumpkin seeds I want to show you you can do this with whole pumpkin seeds but generally I like to just use raw pumpkin seeds that are inside that have been essentially shell so you can see here that these have been roasted so I literally just took the rocket peethas and I put them in a bowl and mixed in about a tablespoon or half a tablespoon of olive oil and I put a little bit of sea salt I like to use coarse sea salt with this type of thing so I put in some coarse Himalayan sea salt and a little bit of paprika and I just laid it out on baking sheet on a low baking tray and I put it on parchment paper in the oven at about 350 degrees and I roasted it for about 10 minutes and then it was ready to go and so this is a delicious thing to garnish your soup with but also great to put on salads or to eat as a little treat in the middle of the day as a snack pumpkin seeds are so happy there's so many wonderful antioxidant and then that's fiber this delicious fats and they're just great for all kinds of different phytonutrients in the body I have a wonderful recipe in on my vlog from LTC cauliflower bread that uses pumpkin seed flour which is literally hanging hot pumpkin seeds putting them in the food processor at the blender and making them into a coarse meal and it is such a wonderful bread and so rustic but super nutritious as well so let me show you what the actual soup looks like when it's all done so here we have see it's a nice thick beautiful pumpkin soup and it is so nourishing and fragrant the cinnamon and nutmeg and allspice and cloves it's just wonderful and what I'm going to do is I'm actually going to put a little bit of pumpkin seeds in the center as a garnish which makes it so beautiful and then I'm going to take a little bit of sweet paprika there's a great store in our area Kenzie's and they do have a national catalog you can find them online really great quality spices for your kitchen a lot of professional chefs use it as well they're pretty affordable but they're so well made and they really last for a while very very good quality so this is the Hungarian style sweet paprika which I use a lot in my kitchen and I used it to roast the pumpkin seeds with but I'm also going to sprinkle a little bit over my soup and you can just see how beautiful that looks pumpkin seeds in there paprika mmm oh that is just so delicious that pumpkin is so luxurious and texture it's really silky but also it's there you can definitely taste the cinnamon the allspice and not make the cloves just melted together to make this beautiful just fragrance and the seeds or the crunch and a little bit of saltiness it is a really wonderful soup and definitely something to welcome your family at home on a cold day so I highly recommend that you try this it's a really simple recipe remember that you can make all kinds of variations on a theme you can use butternut squash you can use an acorn squash you can add a little sweet potatoes in the carrot you can switch out the apples for pear which makes a nice little bit of a change in sweet and tart flavor but it's a wonderful soup and the biggest concept if it's particularly not the pumpkin is you're gonna peel it you're gonna cut it in half and take out the seeds and then you're gonna chop up into cubes and put it in over the onion and the apple or the pear and you're gonna cover it with chicken broth and flip it of water and put in your seasoning and then you're gonna bring it up to a boil and once it starts boiling you can lower to a simmer and just let it sit you're gonna stir it every now and then and once everything is really soft and Forks motional and you know it's ready and then you can use your immersion blender to blend it into that smooth silky consistency or just let it cool and I put it into your blender it makes the most wonderful wonderful suit so I highly recommend that you try this it's definitely paleo because there's no grating is no leg you just no sugar there's no dairy if you do want a little bit more of a creamy consistency you can definitely put a copper 1/2 a cup of coconut milk in and that will definitely make it a little bit of a different flavor profile you can add a little bit of creating that coconut milk and gift a little bit of a Thai flavor there's lots and lots of options but I hope you try it and I hope you visit my blog simply paleo comm because there's a ton of wonderful recipes and strategies and tips on how to incorporate paleo lifestyle into your life and how to do it easily and also to just remind you that I love requests be the requests to something they even wanted to eat forever if you haven't able to tolerate it and you've got when you're looking for a good healthy substitute or just your wish list of things that you'd love for me to do demonstrations live I'd love to hear from you so thanks so much for joining .
Video Description:
In this Simply Paleo episode with Ayelet Connell PhD, she demonstrates how to make delicious Pumpkin Soup-- a perfect fall dish! For more videos and to learn more about the Paleo diet and Ayelet, check out her blog at www.simplypaleo.com.
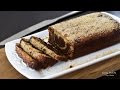
hi guys this is simply eatable with Amanda man and today I'm going to show you an awesome sweet potato bread and this bread is great for breakfast it's great for snacks it kind of tastes a little bit like a pumpkin pie which is amazing but there's no added sugar and it's grain free and paleo so technically you can add any time in it you know really doesn't matter so let me show you what I got I have coconut oil eggs coconut flour cinnamon nutmeg allspice baking soda baking powder salt vanilla and almond butter I'm going to show you a few little substitutions if you need to I do have about two and a half cups of mashed sweet potato here but I need three cups so I've added some applesauce to that so we'll get right into it first we need to mix all of the wet ingredients so I'm going to start with the almond butter and the almond butter you can actually substitute any other nut butter that you prefer I actually have done done better as well which is sunflower seeds however it does turn your baked goods a little green tastes just fine but it just turns a little green there's the eggs and the coconut oil and of course I forgot my vanilla with my wet ingredients so we got to put that in there real quick there's the vanilla all right now I'm going to go for the dry stuff I've got my coconut flour all my spices and a pentacle get all this stuff out of the way all right so now I have my mixture I have a greased pan I put coconut oil all over it and this is one of the Pirates pans it's um it's eight by six and it comes with the lid which is fabulous because then when you're finished with it if you don't want to take it out and wrap it up again you just pick the lid on it awesome voila Evo and then we put it in the oven for 350 for about an hour I usually start checking it at about 50 minutes and we'll see how this goes all right guys I am done with my sweet potato bread and it looks and smells fabulous okay so if you are the kind of person that wants to take this out it probably works a little bit better if you use a use parchment paper on the bottom then you can pull it right out I'm going to pull this out OOP as you can see very hot but fabulous bread right there grain free which is amazing I mean I know it doesn't look pretty smaller but good good got a very great sweet dense texture that's perfect for these kinds of breads and bonus no added sugar which is awesome actually I think the applesauce made it just a tad sweeter than just straight sweet potato why you mentioned before is this this recipe is interchangeable with pumpkin sweet potato again if you're low on pumpkin or sweet potato you can always sub in some applesauce however I would I don't know that I would substitute the entire three cups for applesauce I have to try that one anyways I hope you liked it if you've made any other substitutions and you want to share with me please let me know I love hearing that kind of stuff comment and let me know what you think I hope you liked the video and subscribe for more and thanks so much thanks for watching .
Video Description:
Lightly sweetened sweet potato bread. Great for breakfast or snack! For full recipe, go to www.simplyeatable.com