Post With Label sugar free - All Paleo Diet Recipes All Paleo Diet Recipes: sugar free - All Post
Showing posts with label sugar free. Show all posts

Monday, March 29, 2021

thumbnail

Easy Paleo Keto Bread Recipe – 5 Ingredients


Warning: file_get_contents(http://www.youtube.com/watch?v=r9wiyrIrhvs): failed to open stream: HTTP request failed! HTTP/1.0 429 Too Many Requests
in C:xampphtdocscodeketodietstart.php on line 29
.


Video Description:


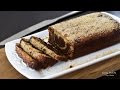
If you want to know how to make the best paleo keto bread recipe, this is it! It’s quick & easy to make with just 5 basic ingredients.
------------ ↓↓↓↓↓ CLICK FOR RECIPE ↓↓↓↓↓ ------------

* FULL RECIPE HERE:
* FREE LOW CARB COOKBOOK:

SUBSCRIBE to my channel:

Connect with me on social media for more exclusive keto low carb recipes:
* FACEBOOK:
* PINTEREST:
* INSTAGRAM:
* TWITTER:

Wholesome Yum creates natural, gluten-free, low carb recipes with 10 ingredients or less. If you are looking for healthy easy recipes that don't require a lot of time, this channel is for you. You'll find all low carb and keto recipes, as well as lots of paleo, LCHF, sugar-free, diabetic friendly, THM, and more.

MORE LOW CARB RECIPES TO TRY:

* Low Carb Donuts Recipe - Almond Flour Keto Donuts
:
* Low Carb Bread Recipe – Almond Flour Bread (Paleo, Gluten-Free)
:
* Low Carb Bagels with Almond Flour (Keto, Gluten-free)
:


Tuesday, March 9, 2021

thumbnail

Paleo + Whole30 Coconut Chicken Thai Curry


.


Video Description:


For the full recipe visit:

Paleo + Whole30 Coconut Chicken Thai Curry - a flavorful and healthy chicken and vegetable thai curry recipe. Ready in under 30 minutes! Gluten free, grain free, keto, dairy free, sugar free, clean eating, real food.


Saturday, March 6, 2021

thumbnail

Banana Granola (Oat Free Granola!) (Vegan, Paleo, Gluten-free)


hi everyone its Adriana from living healthy with chocolate today I'm gonna be showing you how to make the most delicious and healthy banana granola let's get started by preheating our oven to 350 degrees and making our banana mixture we need a full cup of banana puree so peel your bananas and mash it with a fork here I'm using a type of bananas called apple bananas they are a common variety here in Hawaii they are small they have a tangy flavor yet they're really sweet they're really delicious and if you can find it where you are make sure to grab some okay so fill your measuring cup and then we turn the puree to the bowl now I the cinnamon vanilla powder melted coconut oil and salt now we need to coarsely chop the caches and the seeds and I'm using my food processor but you can use just a knife add the chopped cashews and seeds to a very large bowl and then mix in the shredded coconut chia seeds and coconut sugar now we just need to stir everything together until everything is well combined as always you can find this recipe on my blog and I'm leaving the link to the post in the description of this video top a few large dates and add it to the mixture the dates are one of my favorite things about this granola it adds a chewy texture and a delicious sweet taste now stir in the banana mixture until everything is combined now spread the mixture evenly in a cookie sheet that's lined with parchment paper here the pan am using is 11 by 17 inches cover the pan with aluminum foil and bake for 20 minutes then remove the foil and bake for another 15 minutes keep a close eye on it so that it doesn't burn let it cool in a cooling rack for five minutes and chop it into pieces I personally like leaving a few larger chunks but it's up to you this granola is crispy it's crunchy it's much better for you it's got a mild banana flavor and it's not too sweet if you do like your granola a little bit sweeter feel free to add more sweetener but the fact that it's not just sweet is what I love about it my personal favorite way to enjoy this granola is sprinkled over some acai you know I'm from Brazil and I love acai it's actually pronounced acai not acai I actually have a traditional acai recipe for you on my vlog and I can leave the link to that post below so try this recipe at home it's delicious sprinkled over some ice cream or your favorite yogurt let me know what you think if you have any questions or comments please leave them below and if you liked this video give it a thumbs up and don't forget to subscribe to my channel if you make this recipe or any of my recipes please post a photo on my blog so I can see thank you guys and I'll see you next time bye .


Video Description:


My healthy Banana Granola recipe is packed with real foods, has a great granola texture and a lovely mild banana flavor. Free of oats and grain-free.

Full recipe here:

Shop for the ingredients and brands I use in this recipe:

Pin to Pinterest:

Recipe for my traditional Brazilian Acai:

----------------------------------------­­­­­------------------------------------­-­-
My cookbook:
----------------------------------------­­­­­­­­­­­------------------------------­-­-­-­-­-­-­-­-

• Comment and ask me questions below.
• Subscribe to my channel and like this video if you liked it (this helps my channel grow so I can continue to bring you new episodes)

Follow me:
INSTAGRAM: .
FACEBOOK:
PINTEREST:
TWITTER:

---------------------------------------­­­­­-------------------------------------­-
• Contact me • adriana@livinghealthywithchocolate.com
----------------------------------------­­­­­­­­­­­------------------------------­-­-­-­-­-­-­-­

#paleogranola #vegangranola #granolarecipe


Friday, February 26, 2021

thumbnail

Chocolate Orange Marble Cake Recipe (Gluten-free, Paleo)


hi everyone its Adriana from living healthy with chocolate and in today's episode I'm going to teach you how to make my recipe for orange marble cake this is an amazing light and fluffy cake with beautiful chocolate and vanilla layers this cake is very easy to make and it tastes delicious it's made without gluten grains dairy or refined sugars let's get started by juicing and zesting and orange now in a large bowl mix the wet ingredients together the egg yolks orange juice and zest coconut oil honey and vanilla extract whisk to combine everything in a separate Bowl let's mix the dry ingredients the almond flour coconut flour baking soda and salt one thing that's important and I want to note is that you give your cake the right texture you should use blanched almond flour that has been finely ground not all brands work the same for baking so I'm leaving the link to the one I use in the description of this video okay so now let's mix the wet and dry ingredients together gently being careful not to over mix now using a stand mixer whip the egg whites in lemon juice until steep peaks form now fold in half the egg whites mixing gently and then the other half place half the batter in a bowl and mix in the cacao powder so now here I have an a by four inch pan and I've lined all four sides of the pan with parchment paper so that nothing sticks during baking begin by adding a spoon of the chocolate batter in the center of the fan followed by the vanilla batter repeat this process until all the batter is used I've written the recipe for you on my blog with all the measurements and detailed instructions and I'm leaving the link to the post in the description of this video tap the pan on a counter gently and bake in a preheated oven to 350 degrees until a toothpick inserted into the center comes out clean place the pan on a cooling rack to cool for at least 10 minutes before removing it from the pan to make my cake even prettier I like this thing to talk with some maple sugar warm right out of the oven this cake is delicious light and fluffy not too sweet I like it even more the next day after its cooled in the refrigerator after its chilled it becomes a little more dance and I love the cool flavor of the orange I hope you guys try this recipe at home and share with everyone if you have any questions or comments please leave them below and I'll answer them and if you like this video please support me and give me a thumbs up also please don't forget to subscribe to my channel thank you guys for all the love and support until next time .


Video Description:


My Chocolate Orange Marble Cake is a two-toned layered cake infused with chocolate and orange flavor. Baked into a soft and moist cake without using any gluten or grain flours. (Gluten-free, Paleo)

Full recipe here:

Shop for the ingredients and brands I use in this recipe:

PIN recipe to your Pinterest board:

----------------------------------------­­­­­------------------------------------­-­-
My cookbook:
----------------------------------------­­­­­­­­­­­------------------------------­-­-­-­-­-­-­-­-

• Comment and ask me questions below.
• Subscribe to my channel and like this video if you liked it (this helps my channel grow so I can continue to bring you new episodes)

INGREDIENTS USED:
Almond flour -
Himalayan salt -
Coconut flour -
Baking soda -
Raw Cacao Powder -
Coconut oil -
Vanilla extract -
Maple sugar -
8x4 cake pan -

Follow me:
INSTAGRAM: .
FACEBOOK:
PINTEREST:
TWITTER:

---------------------------------------­­­­­-------------------------------------­-
• Contact me • adriana@livinghealthywithchocolate.com
----------------------------------------­­­­­­­­­­­------------------------------­-­-­-­-­-­-­-­
#orangecake #marblecake #healthycake


Tuesday, February 23, 2021

thumbnail

Simply Paleo: How to make Paleo Focaccia Bread!


hi there my name is Alec tunnel and I'm a gluten-free and paleo chef and this is an episode of simply paleo with me today we're gonna be learning how to make paleo focaccia bread and focaccia bread is the type of bread that is frequently in more Italian cultures you go to an Italian restaurant that a lot of times it's what they serve in the beginning it's just almost like a pizza crust that's pretty thick and has been seasoned with all types of herbs and spices and then sliced into bread portions and it's delicious and it's a perfect vehicle to soak up olive oil and balsamic vinegar and any other type of dip fit you have in mind so we're gonna be making focaccia bread today but we're gonna be making it the Paleo way which means no grain at all so let's get started so I like to use a KitchenAid mixer because it does a lot of a mixing work for me but you can definitely use a large bowl if it's your preference so we have our large bowl here and we're gonna be putting in all the dry ingredients and mixing them so they get incorporated and then separately we're gonna do the liquid mixture and the liquid ingredients and then we're gonna pour the liquid into the dry and mix it up so that it becomes a batter or dough for the pizza or foot talked about so in this bowl I have one and a half cups of cassava flour now for those of you that are new to the paleo lifestyle cassava flour is a flower that is grain free it's actually made from the cassava root some of you may be familiar with tapioca starch tapioca starch is actually the starch that's been extracted from the cassava root so cassava flour is the whole root that's made into a flour and it's perfect a perfect flour vehicle to make a lot of things most things you have to mix it with other types of alternative flours to get the right consistency but if you're making things like tortillas it's perfect on itself so we have a cup and a half cassava flour and then we have a cup of arrowroot starch which is also made from the arrowroot a root vegetable and so we're going to mix both of those in here and then we've got a couple of other dry ingredients in here I have one teaspoon of sea salt I typically use fine sea salt when I'm putting it into things and if I'm sprinkling something on top I might use more of a coarse Himalayan type so in here I have a teaspoon of fine sea salt and a teaspoon of cracked dried rosemary now rosemary is very easy to find in a dried form but it can be a little bit off-putting if you get a whole bit of it so a lot of times what I'll do is I'll take the rosemary and I'll put it in a mortar and pestle and I'll crush it a little bit not into a total powder but just enough so that they're not large chunks or large sort of Spears you can also do it in the palm of your hand just by crushing them with your fingers whatever works so got a teaspoon of that and then we've got a teaspoon of onion powder and today I mix it up a little bit there's a wonderful spice store called Penn ZZZ and their local toss in Connecticut but they also have a fantastic website in catalog and they're really good quality spices and spice blends and they're not exorbitant ly expensive and they have granulated air-dried shallots which are a little bit sweeter in this form than the typical onion powder but just the savoury also so I use the teaspoon of the shallot powder which you can also interchange it with onion powder and so what I'm gonna do is take those three ingredients and mix it into my dry mix and then I'm going to take the bowl and put it in the kitchen a sauce or stand and turn it on just to get everything incorporated but if you have a large bowl and a spatula that's fine too you can just we need to refine this in and we're just mixing it up so that all the ingredients are mixed well before we put our liquid ingredients right nice and mixed so now I want to do the liquid mixture so in this measuring cup I have a cup of water which ideally is filtered water or some type and then I have half a cup of extra-virgin olive oil that I've already mixed in here now in addition to this I want to add two eggs and then what I'm going to do is whisk this separately because I don't want to put all the individual ingredients into the dry batter I want to really make sure it's already mixed not to say that it doesn't work the other way but this definitely creates more of a consistent batter which is what you want so that when you're eating it it has more of a consistent texture okay so what we're going to do is we're going to whisk up the two eggs the 1/2 a cup of extra virgin olive oil and the cup of water until it's consistent and incorporate as well and what I'm going to do now is I'm going to take this and I'm gonna pour it into my dry mix and then as they start to get incorporated we'll go to the yep now if you're doing it in a bowl mix it up and pull it to blue now if you're using the KitchenAid mixer partway through what you want to do is scrape it down because sometimes there's bits of the dry mix that's stuck on to the paddle and kind of cover it up by selling the batter so it's helpful to scrape it down or you can just turn it off and just mix it some more with a spatula by hand so we're gonna just use the mixer now this batter is not a typical pizza dough batter in the sense that it's a little bit stickier than what someone would be used to with a more you know gluttonous pizza batter so we're just gonna take this off and I'll show you the consistency now wall-eyed before I did this I preheated the oven to 425 and while I preheated it I actually took the baking sheet or the half baking sheet that I was using and I put it in the oven before I turned it on and then I preheated the oven with a baking sheet inside and the idea is to try to get the baking sheet to be really hot so that the pizza crust can get a little crispy on the bottom it's kind of like using a pizza stone and you can certainly do this on a pizza stone just make sure you're using parchment paper because as I said this does get a little sticky so let's show you this batter we're gonna bring it closer to the video and you can see that it's a sticky batter but it's not wet it's not liquidy now what we're gonna do is we need to roll it out you can put it on to use oil or wet fingers to spread it out but what we're gonna do is we're gonna put another piece of parchment paper over it and we're gonna just use a rolling pin now it's a little bit of a awkward process sometimes because the parchment paper can get a little mobile so first we want to just get the batter onto the parchment paper so I have to pretty bit the equal size sheets of parchment paper before I put the baking sheet in the oven i measured the parchment paper to make sure that it was the right size okay all right so now we've got this ball of dough and I could use wet oils fingers to spread it out into the shape that I want but instead I'm going to I'm just trying to get all this good stuff off there we go I'm gonna just take another sheet of parchment paper my finger wants achacha to be the focaccia dough to be a little bit more thicker than a typical pizza crust just gonna take my rolling pin and I'm just going to gently create a smoother consistency okay and try to give it the shape that I want which is somewhat rectangular I'm not being a perfectionist here but I'm gonna try to get it to be the shape of the baking sheet essentially you don't have to worry about having extra crust because the whole thing is across right that's the idea and if you get a little bit that comes off the parchment paper it's not a big deal we can fix it after okay so now we've got the parchment paper that's spread over and everything's rolled out - the next step is to get is to get the hot baking sheet so wait right here here's the parchment paper then you can get it to be a little bit smoother you can spread down the side that might have been rolled up too far away either way is fine but just be careful because that baking sheet is a little bit hot right and I'm just gonna spread it out now if you have a little bowl of water or oil you can wet your fingers or wet your spatula which is a good way to do it too and that's it and now what we're gonna do is take the remaining teaspoon of crushed rosemary that's been dried and also a half a teaspoon of more coarse sea salt or if all you have is fine that's fine too but I have the Himalayan coarse sea salt and I'm gonna take this and I'm gonna sprinkle it on top and this is what gives it that incredibly flavorful taste it's all that salt on top it's so good for you the sea salt has so many wonderful minerals and then you really don't have to worry about the sodium issue because when you're eating sea salt there's such a balance of minerals and sodium is not the overpowering mineral in the mix and then you've got the rosemary that's so flavorful and there you go and now what we're gonna do is we're gonna take this and we're gonna put it in the oven so I'm gonna do that after we talk because I made focaccia bread beforehand rosemary and salt it's so fragrant so we are going to cut it into slices and see what it tastes like so let's see it just came out of the oven and you can see how it's slightly thick and let's see here all right you can see how it's thick and it's got the wonderful seasoning on top and it is so fragrant mmm so delicious it's crispy on all the surfaces and inside it's a little bit of that doughy delicious soft warm texture did you take a bite you get some of that Himalayan sea salt for the rosemary which is so so wonderfully flavorful in your mouth and then of course you get some of that onion powder flavor with a rosemary inside it's so delicious mm-hmm really yummy this is a perfect accompaniment to so many different meals so good my kids were very excited to hear that I was doing focaccia bread for the video today because of course that means we're having two layers of focaccia bread was our dinner they were very excited because it's so delicious and if you make it in advance you can just put it in the oven to heat on 325 350 and just heat it up again they'll get a little crispy on the outside but it'll get nice and warm again on the inside and then just cover it up until you're ready to serve and you can slice it in any way that you want Pizza wedges squares anything so I'm glad you watched I hope you make this recipe at home it's pretty simple recipe everything goes into the bowl and then you lay out left the dome we're gonna get this delicious focaccia bread and as always I'd love to hear from you and you wish list you have any cravings and questions you can check me out on my blog at wwlp.com and I hope to hear from you and stay tuned for more episodes of simply paleo and you can see lots of wonderful recipes and cooking demonstration videos on my blog as well so take care .


Video Description:


Welcome to Simply Paleo with Ayelet Connell PhD! During this episode, watch Ayelet demonstrate how to make Paleo Rosemary Focaccia bread. For more episodes of Simply Paleo, visit www.SimplyPaleo.com.


Sunday, February 21, 2021

thumbnail

Low Carb Paleo Almond Flour Pie Crust Recipe – 5 Ingredients


.


Video Description:


This low carb paleo almond flour pie crust recipe is so easy to make. Just 5 minutes prep and 5 ingredients! Gluten-free, sugar-free, and keto.
------------ ↓↓↓↓↓ CLICK FOR RECIPE ↓↓↓↓↓ ------------
* FULL RECIPE HERE:
* FREE LOW CARB COOKBOOK:

SUBSCRIBE to my channel:

Connect with me on social media for more exclusive keto low carb recipes:
* FACEBOOK:
* PINTEREST:
* INSTAGRAM:
* TWITTER:

Wholesome Yum creates natural, gluten-free, low carb recipes with 10 ingredients or less. If you are looking for healthy easy recipes that don't require a lot of time, this channel is for you. You'll find all low carb and keto recipes, as well as lots of paleo, LCHF, sugar-free, diabetic friendly, THM, and more.

MORE LOW CARB RECIPES TO TRY:

* Easy Keto Low Carb Pumpkin Pie Recipe (Sugar-Free, Gluten-Free):
* Pumpkin Pie Cupcakes With Crumble Topping (Paleo, Low Carb):
* Low Carb Cheesecake (Keto, Gluten-Free, Sugar-Free):


Thursday, February 18, 2021

thumbnail

Epic Paleo Mexican Chicken Salad


.


Video Description:


Insanely delicious Mexican-style salad with chicken, avocado, pico, tomatoes, green onions, cherry tomatoes, and a dreamy cilantro vinaigrette. Just 30 minutes required for this paleo, gluten free and dairy free meal!

Full recipe:

PRODUCTS:
Pepper and salt mill -
Olive oil -
Salt -
Black peppercorns -
Cumin powder -
Garlic powder -
Cayenne pepper -
Dried oregano -


Instagram:
Facebook:
Pinterest:


Wednesday, January 13, 2021

thumbnail

How To Make Healthy Paleo Jelly Lollies! Super Easy Recipe!


do you live a healthy paleo lifestyle and wondering how you can get jelly lollies back into your life course you are we're here to show you how welcome to that Mary mega channel today we're talking healthy jelly lollies YUM because before paleo and before healthy living we wear like sugar and it's like we could just eat all the holism wanted then we'd go slave away at the gym for like two hours burn up all of those calories so it's not just like I like the way we live now we want to share with you guys how we make paleo healthy jelly boys yes you can do it they're actually like super good for you why well we actually make them with gelatin it makes your skin clear it makes your hair shiny and makes your nail a strong your joint yeah it's really good not good like you know arthritis mmm osteoporosis yeah we're gonna share how to make healthy jelly Louise no way paleo - yes way alright get all of your ingredients together you're gonna need fruit juice gelatin natural sweetener and silicon molds today we're using lemon juice but you can use whatever you like think be true orange strawberry add your juice to a saucepan and sprinkle with one and a half tablespoons of gelatin powder allow that to sit for around five minutes and it's gonna turn into this jelly paste place the saucepan on your stove on medium heat and heat for around five minutes until the jelly paste becomes smooth pour the jelly stuff into cute little molds we're using ducks and it's cute because they're yellow so they look like ducks place the mold into the freezer for 20 minutes then it's as simple as popping them out and eating them they look so super cute and they're ridiculously yummy the perfect snack in fact they're kid-approved Ameriprise of them - did you guys like those paleo jelly loved those paleo jelly if we missed anything if you need the recipe in your life click the link below it goes straight to a recipe on the merrymaker sisters calm it's that this recipe features in our brand new book make it marry that I have a copy right here on some slow down I have a copy right here yeah if you guys want your print if you want to on the blog if you want your we're covering all bases jelly lollies are going to be in your life one day very soon .


Video Description:


Didn't quite catch the recipe for our Paleo Jelly Lollies? Check it out HERE:


BUY THE BOOK HERE:


GET OUR FREE HEALTHY SWEET TREAT EBOOK:


FIND ALL OF OUR FREE RECIPES:


CHECK OUT ALL OF OUR BLISS FOLLOWING TIPS:


JUST HAVE FUN OVER AT:


GET SOCIAL WITH US:
Instagram :
Facebook :
Pinterest :
Twitter :

Always merrymaking,

Emma + Carla


thumbnail

Pumpkin Soup cooking demonstration, Simply Paleo episode with Ayelet Connell PhD


hello my name is al O'Connell and they're paleo and gluten-free chefs and this is an episode of simply paleo with me and today being fall and beautiful beautiful weather crisp crisp season this morning there's frost on my car it's all things pumpkin pumpkin is definitely symbolic of the fall season and in New England it's a big part of our culture so today we're going to be making pumpkin soup and pumpkin soup is a wonderfully nourishing fragrant fall soup but what's wonderful about this recipe is there's a lot of variations on the theme that you can make to mix it up and still use the basic same recipes so today we're going to be using it sugar pumpkin which is essentially a small type of pumpkin that's a little bit sweeter in flavor and we're gonna be using apple and some autumn seasoning like cinnamon and nutmeg and allspice and some ground cloves and some onion and some chicken stock and a little bit of maple syrup it's a very simple recipe and very easy to make so I did a little prep before you join me this morning just so that we don't have a lot of extra time involved in between the steps so the first thing I did is I have my big stew pot here that's on the stove and I put about a tablespoon or two of olive oil in and heated up medium heat and I took an onion you could use a small onion a large I mean it doesn't matter really depends on the flavor profile that you prefer I usually do a medium to small onion and I chopped it up I cut it I peeled it I chopped it into small pieces and I put it in the oil looks it was hot and I caramelized the onions and so you just want them to be nice and soft and translucent and you can smell that caramelized onion smell in the air too and you give definitely the pumpkin soup a little bit more of a hearty flavor but it is somewhat of a sweet soup so it gives you a nice robust flavor but the reason the size of the matter so much is because if the end we're going to be blending the soup to give it a nice puree and silky texture so though I'll answer already caramelized that I have it on low so it wouldn't be bothered with too much of the noise now I'm just raise the temperature a little bit now what I did earlier which is really helpful is to take a pumpkins I'm going to go through the steps with you so a sugar pumpkin is about this size so you need one of these for the soup and what you want to do is pick the San Juans which be a little bit careful when you so large knife if you want to be a little careful because a little tough to do and then once you take the stem off you can cut a pumpkin in half from top to bottom and then what you want to do is take the seeds out so you see that the inside of the cavity is filled with pumpkin seeds or Fitbit does so what I want to do is take it out you'll see on this side I just used a spoon to remove the seeds and I literally just try to scrape a little bit further than where the seeds reside on the inner layer and then just scoop them out so I'll show you with this one how to do that you can see where the seeds are so what I do is I kind of dig a little bit about half you can see how I'm doing that around where the seeds are a little bit into the meat as well just to make it easier so I don't feel like I have to scrape the seeds and then nice and easily they come out and then what I'm gonna do is just star of the seeds and if you want to make roasted pumpkin seeds is a great recipe on my blog on simply paleo calm where you take the pumpkin seeds so make sure that they're nice and dry and you can mix them with a little bit of oil and season it and in my case I use some salt and a little bit of pepper and some paprika and then you just put it in the oven at about 350 degrees on some parchment paper make sure that it's spread out in a thin flat layer and roast um but you have to keep monitoring which shouldn't take more than about 10 it's but if you started to hear them popping then they can definitely get close to burning and so they didn't want to be able to lower the oven if they're not all roasted yet or turn off the oven in Sigma okay so how do you remove the season either discarded them or set them aside to you to make them into rusyn seeds you can see the empty cavity so I have here a tray a metal tray and the oven is preheated at 425 degrees which is a good temperature to roast winter squash boards and what I'm going to do is I'm going to sprinkle a little bit of salt on and I always like to use sea salt because with a lot of wonderful minerals in it but I'm not too concerned about sodium levels with sea salt and then what I'm gonna do is take a mixture of about a half a teaspoon of cinnamon 1/4 teaspoon of nutmeg and then like a pinch of ground cloves and some allspice you could do more than that if you want but I'm literally just gonna sprinkle this on the open space of the pumpkin to get a nice coating okay you can see it's just nice and well-seasoned and then I'm gonna take a little bit of olive wood it can take regular olive oil or you can take an olive oil spray just try not forget it in your face and just push the inside oil and then the last step for this part is we're going to take the pumpkin and we're gonna put it facedown on parchment paper and then we're gonna take it and we're gonna put it in the oven remember it 425 and what you want to do is cook it takes about a half an hour at 425 but it kind of varies depending on the size of your pumpkin and you don't have to use a sugar pumpkin but they're just a little bit sweeter and a little bit easier to manage and then what you're gonna do is when you how you know the pumpkins ready is it take a fork and you try to puncture it through the outer skin of the pumpkin and if it goes through very easily and you can smell that smell the pumpkin and it's sizzling a little bit on the bottom line you know it's red and you can take it out cool but for the suit typically when I do winter squash like butternut squash acorn squash I typically just peel it and cut it in half take out the seeds and discard them and then I chop it up into big chunks and I just put it in a soup that way I don't roast it in advance but with a pumpkin the skin is so thick it's really hard to peel and this is just a great way to do it it makes the soup process a little bit quicker so today's about a half an hour to cook but I did another pumpkin earlier just so that we would have to wait that amount of time and I want to show you how it looked so this is essentially the pumpkin that's been roasted and you can see how it's nice and dark in color from the cinnamon that is so fragrant beautiful and it's literally starting to come out of the skin so as you can see when I started to do is I took the meat out of one half and now let's do it I'm just gonna add it to here to this bowl and this literally is simple it's just scooping it out of the peel and it is so fragrant the smells I can just smell those an extra seat here cinnamon nutmeg cloves the allspice it is so wonderful it definitely makes me think of all the pluses of the policies and the frost is the negatives for sure my car this morning that my husband very sweetly got rid of and when I went out this morning picked the kids to school I noticed that the frost had been scraped and I thought to call and say thanks victim kisses the phone so here's my pumpkin so the next step I have the onions caramelize and now what I'm going to do is put the pumpkin in and I'm going to put some chicken broth in this it's about a quart now the amount of chicken broth that you use is really dependent how much company huh and how thick or thin you want the soup so typically I'll do a quart of chicken broth and I'll do about the two cups of water the water I might reduce depending on how thick roots I want the suit put the chicken broth in the Cupid chapter because I want the broth to come and the soup to come to a boil before I leave it to simmer I'm going to add the water in as well and this is topstitch water honey and then I want to do is take an apple if it's a really nice sweet somewhat tart flavor also added to the pumpkin soup so generally what I'll do is I'll just peel the Apple and cut around the core to start the core just chop it in chunks and put it in so I've already done that so you can see that they're just pretty big chunks it really doesn't matter because once it's nice and soft from the boiling of the broth then we're just gonna blend it with an immersion blender so I'm gonna add the apples in now when I do this type of soup with winter squash like butternut squash or acorn squash then typically I'll add seasoning to the suit instead of putting it right on the squash you think if this hasn't been roasted so in that case I'll do about a teaspoon or a half a teaspoon of cinnamon I'll do a half a teaspoon or a quarter teaspoon of nutmeg and I love doing a quarter teaspoon of allspice and about a pinch of cloves and then I'll typically do about a teaspoon of salt but in this case we put some salt on the pumpkin already so I'm gonna put about 1/4 teaspoon of salt in the soup in addition and you know you think that's a sweet food salt always seems to make it a little bit sweeter because I think it helps to make the flavors more robust so then the last ingredient which I typically wait it's a nice hot hot I typically wait until it's boiling it can maple syrup and the maple syrup it's about a quarter I just found a little seed in here a quarter cup of maple syrup so I have that ready and waiting here in my little bowl and as it comes up into a boil then I'm gonna add the maple syrup and then what I'm gonna do is I'm gonna bring it up to a boil and then I've didn't lower it to a simmer and I'm just gonna let it cook until the apples are fork tender literally can be switched to the fork and then I know that it's well uncooked and then what I'll do is take it off the burner and let it cool a little bit and then if you have an immersion blender that's always easiest now I have a commercial immersion blender this week we lovingly termed it as our boat motor at home and what I love about it is its metal and I don't have to do a lot of cleaning but also I'm not exposing plastic to heat in anything that I'm eating which is really important because there's a lot of toxins that can get to your body from keeping up plastic so I'll use the immersion blender which is very simple I'll just plug it in and I'll stick it in the soup make sure it's submerged and then I just turn it on high until everything it's really silky and texture but if you don't have an immersion blender which is fine then what you can do is let the soup cool and then put it into your blender and blend the soup and then it's ready to go and nice and delicious so this is coming up to a boil so I'm gonna take the maple syrup and I'm gonna pour the maple syrup and I'm just gonna stir it and then I'm just gonna let it continue to boil a little bit to get everything incorporated and then I'm gonna lower it to simmer and then I'm just gonna let it cook for a while it might take an hour so maybe half an hour depends on how high the simmer is until everything's really soft and then you can use the immersion blender or let it cool completely put it into the blender flex it up and there you have your soup and I will say that this soup is delicious the day after we'll treat very nourishing and the only you can do as you can garnish the soup which I'll show you the moment with a little bit of roasted pumpkin seeds I want to show you you can do this with whole pumpkin seeds but generally I like to just use raw pumpkin seeds that are inside that have been essentially shell so you can see here that these have been roasted so I literally just took the rocket peethas and I put them in a bowl and mixed in about a tablespoon or half a tablespoon of olive oil and I put a little bit of sea salt I like to use coarse sea salt with this type of thing so I put in some coarse Himalayan sea salt and a little bit of paprika and I just laid it out on baking sheet on a low baking tray and I put it on parchment paper in the oven at about 350 degrees and I roasted it for about 10 minutes and then it was ready to go and so this is a delicious thing to garnish your soup with but also great to put on salads or to eat as a little treat in the middle of the day as a snack pumpkin seeds are so happy there's so many wonderful antioxidant and then that's fiber this delicious fats and they're just great for all kinds of different phytonutrients in the body I have a wonderful recipe in on my vlog from LTC cauliflower bread that uses pumpkin seed flour which is literally hanging hot pumpkin seeds putting them in the food processor at the blender and making them into a coarse meal and it is such a wonderful bread and so rustic but super nutritious as well so let me show you what the actual soup looks like when it's all done so here we have see it's a nice thick beautiful pumpkin soup and it is so nourishing and fragrant the cinnamon and nutmeg and allspice and cloves it's just wonderful and what I'm going to do is I'm actually going to put a little bit of pumpkin seeds in the center as a garnish which makes it so beautiful and then I'm going to take a little bit of sweet paprika there's a great store in our area Kenzie's and they do have a national catalog you can find them online really great quality spices for your kitchen a lot of professional chefs use it as well they're pretty affordable but they're so well made and they really last for a while very very good quality so this is the Hungarian style sweet paprika which I use a lot in my kitchen and I used it to roast the pumpkin seeds with but I'm also going to sprinkle a little bit over my soup and you can just see how beautiful that looks pumpkin seeds in there paprika mmm oh that is just so delicious that pumpkin is so luxurious and texture it's really silky but also it's there you can definitely taste the cinnamon the allspice and not make the cloves just melted together to make this beautiful just fragrance and the seeds or the crunch and a little bit of saltiness it is a really wonderful soup and definitely something to welcome your family at home on a cold day so I highly recommend that you try this it's a really simple recipe remember that you can make all kinds of variations on a theme you can use butternut squash you can use an acorn squash you can add a little sweet potatoes in the carrot you can switch out the apples for pear which makes a nice little bit of a change in sweet and tart flavor but it's a wonderful soup and the biggest concept if it's particularly not the pumpkin is you're gonna peel it you're gonna cut it in half and take out the seeds and then you're gonna chop up into cubes and put it in over the onion and the apple or the pear and you're gonna cover it with chicken broth and flip it of water and put in your seasoning and then you're gonna bring it up to a boil and once it starts boiling you can lower to a simmer and just let it sit you're gonna stir it every now and then and once everything is really soft and Forks motional and you know it's ready and then you can use your immersion blender to blend it into that smooth silky consistency or just let it cool and I put it into your blender it makes the most wonderful wonderful suit so I highly recommend that you try this it's definitely paleo because there's no grating is no leg you just no sugar there's no dairy if you do want a little bit more of a creamy consistency you can definitely put a copper 1/2 a cup of coconut milk in and that will definitely make it a little bit of a different flavor profile you can add a little bit of creating that coconut milk and gift a little bit of a Thai flavor there's lots and lots of options but I hope you try it and I hope you visit my blog simply paleo comm because there's a ton of wonderful recipes and strategies and tips on how to incorporate paleo lifestyle into your life and how to do it easily and also to just remind you that I love requests be the requests to something they even wanted to eat forever if you haven't able to tolerate it and you've got when you're looking for a good healthy substitute or just your wish list of things that you'd love for me to do demonstrations live I'd love to hear from you so thanks so much for joining .


Video Description:


In this Simply Paleo episode with Ayelet Connell PhD, she demonstrates how to make delicious Pumpkin Soup-- a perfect fall dish! For more videos and to learn more about the Paleo diet and Ayelet, check out her blog at www.simplypaleo.com.


Thursday, November 12, 2020

thumbnail

Healthy Paleo Breakfast Egg Muffins Recipe – Low Carb


.


Video Description:


Healthy egg muffin cups are the perfect grab-and-go breakfast or snack. This method makes the best low carb, paleo breakfast egg muffins recipe ever!
------------ ↓↓↓↓↓ CLICK FOR RECIPE ↓↓↓↓↓ ------------
* FULL RECIPE HERE: https://www.wholesomeyum.com/recipes/egg-muffin-cups-recipe-paleo-breakfast-egg-muffins/
* FREE LOW CARB COOKBOOK: https://www.wholesomeyum.com/free-ebook/
SUBSCRIBE to my channel: https://www.youtube.com/wholesomeyum
Connect with me on social media for more exclusive keto low carb recipes:
* FACEBOOK: https://facebook.com/wholesomeyum
* PINTEREST: https://pinterest.com/wholesomeyum
* INSTAGRAM: https://instagram.com/wholesomeyumblog
* TWITTER: https://twitter.com/wholesomeyum
Wholesome Yum creates natural, gluten-free, low carb recipes with 10 ingredients or less. If you are looking for healthy easy recipes that don't require a lot of time, this channel is for you. You'll find all low carb and keto recipes, as well as lots of paleo, LCHF, sugar-free, diabetic friendly, THM, and more.
MORE LOW CARB RECIPES TO TRY:
* Easy Coconut Flour Pancakes Recipe With Cream Cheese - Low Carb
: https://www.youtube.com/watch?v=vb0dzwyljQg
* Low Carb Granola Cereal Recipe (Paleo, Gluten-Free, Sugar-Free)
: https://www.youtube.com/watch?v=2sspHZ2jHaM
* 2-Minute Low Carb English Muffin (Paleo, Gluten-Free)
: https://www.youtube.com/watch?v=S5RHnHFAofU

About